Introduction
Today we’re going to show you how we took a standard white Xbox 360 and skinned it into a sexy real carbon fiber Xbox 360. In our upcoming second part, we’ll show you how we did the actual Xbox 360 controller, so be sure to stay tuned for that. You can keep up with Carbon Fiber Gear on our Facebook page for the latest updates. If you are interested in making your own carbon fiber parts and products, be sure to check out the carbon fiber starter kit in our store. It gives you everything you need in one box to start dabbling in carbon fiber yourself.
CLICK READ MORE TO VIEW THE REST
Building the Carbon Fiber Xbox 360
First, we prepped the surface for ideal bonding by sanding with 220-grit sandpaper, taking particular care on the areas that have lower surface areas, such as the edges and around vent holes, to ensure good cohesion
Next, I taped off all of the areas that I didn’t want any resin getting onto, mainly edges where pieces must fit together.
Next, I mixed the resin, I have a 3:1 resin system, with three parts of resin to one part hardener which gives us dry times of 12-14 hours, with a “tack” reached in 1.5-3 hours
Then I evenly applied the resin over the Xbox, ensuring even coverage, but not too thick where the resin will run over into crevices, as this will only create a hassle for later.
After the halves have been evenly coated with resin, we allowed the resin to come to a “tack” for about 2 hours, before applying the carbon fiber. I measured out and cut the carbon fiber in the meantime. Allowing the base layer to come to a tack first allows great adhesion to the carbon fiber, which prevents the fabric from moving or separating after application.
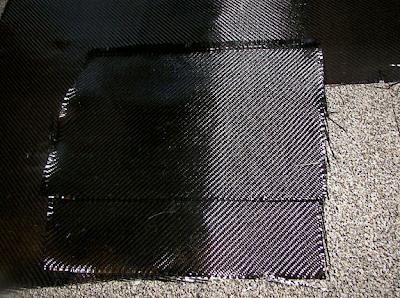
A neat trick for cutting straight lines, you can pull out a single fiber from the cloth, which will create a visible line you may cut from, as seen in this picture in the middle
Here are our two squares
Now, one half applied with the fiber taped back to keep light tension as it cures, and allows it to adhere to the upper edges
After curing overnight, we trimmed off most of the excess, leaving a small bit of excess around the sides until a top coat is applied to ensure that the fibers stay together until then
At this point, we apply a clear epoxy layer over the top of the carbon fiber. After that layer has cured, we scuff over the entire surface very evenly with a low grit (we used 220-grit), as there is still a large amount of texture after the first resin layer. Once again, don’t apply the resin too thick, or it will run and cause headaches later.
Note: It may be best to leave plenty of excess carbon fiber, and not trim after the initial carbon fiber application, since working with your brush near the loose fiber edges may pick up small pieces of carbon fiber which will brush onto your surface, and you often do not notice it until after it cures, and will disrupt the visual appearance of the carbon fiber, or create physical ridges or roughness.
Once you have scuffed over the surface very evenly, knocking down the high spots, rinse off any of the residue from sanding, and you are ready to apply a second layer.
Here we have sanded down the first layer in the same fashion as before and have now applied a second layer. Then I sanded the second layer and applied a thin third layer before final sanding/finishing.
Final sanding and finishing includes multi-grit sanding, working up from 200-grit up to 1200-grit in 200-grit increments. So we went 200,400,600….1200. Once you have done that, there are two options for the final finishing of the piece. One is to use a clear coat, which we opted to do, and we used an automotive clear coat to finish ours. The other option is to use a polishing compound to polish the surface to a gorgeous shine, and since we didn’t have a buffer (which helps a lot) or a lot of patience to hand buff the piece, we went with the clear coat instead. Polishing is a great solution for those who don’t have access to paint/clear coating equipment, or a proper area to use it.
Let it cure, and get something like this!


Thanks for suggesting good list. I appreciate your work this is really helpful for everyone. Get more information at stainless steel hex bolts. Keep posting such useful information.
ReplyDeleteThanks for suggesting good list. I appreciate your work this is really helpful for everyone. Get more information at Inconel 625 pipe suppliers. Keep posting such useful information.
ReplyDelete